

GP2 TO GP3 CONVERSION If we want to convert a good Gp2 track into a Gp3 one, we have the proper tool coming with the track editor that makes automatically part of the job. The conversion will be not complete and almost always we need to do an additional editing on the converted track to make it work in a decent way. The first operation to do is to open a gp3 original track and then click on the button marked below to start the conversion:It will ask us to browse to find the .dat file of the Gp2 track. Once we found and opened it, we’ll see a dialog box where we can choose the parameters of the conversion:
Almost all the properties and commands of the Gp2 tracks are not reproduced into the Gp3 format in the same way, so in the converted track we’ll not see anything we’ve seen driving in the Gp2 version. Of course if we want to recreate the old Gp2 track into Gp3 we must do a complete editing. This means that the conversion allows us to have in a click only the same layout with heights, and the cc-line. When we open the dialog box, some options will be checked and some others will be unkecked as in the picture above. The suggestion is to leave them as they are. Once confirmed the operation we’ll see the track converted into the track editor. Now we need to know if the Gp3 base track is compatible for the conversion. To check this particular we can zoom into the Start/Finish line:
As we can see the fences in the last sector are inverted and cross each other. This means that the track we choosen is not good for this conversion. Surely, trying to load this track, it will crash to desktop. This means that we have to change the Gp3 base track and repeat the operation of the conversion, maybe several times, until we obtain a conversion as the picture below. Now it worked with F1ct07 (Montreal):
Once we are sure of the layout working, we can go to the next step, that consists in fitting the vital commands into their places to work properly. First of all we must immediately save and reload the track otherwise, the track editor may crash in these conditions. Here is a view of the pitlane with its number of sectors:
We must be sure to find the following commands in the correct places. If they exist but in a different place we need to move them. If they are missing we have to add them (see command editing) and if there are doubles we can remove one of them. It’s important to know that the sector p10 is the start of the car parking, from where all the cars stay. The commands below are the ones required. Their position is related to this example, so it may vary from track to track but their order is the same for all. To avoid conflicts it is better to place every command in a different sector because they usually can’t stay at the same offset. 1- sector p0. It must contains a 0xae ‘correct pit line’ and a 0x9b ‘pitlane begin offset’ command. If we find two 0x9b we can remove one of them. 2- sector p5. It must contains a 0x9f ‘pitlane fences begin’. 3- sector p9. It must contains a 0x96 ‘pitlane speed limiter on’. 4- sector p10. It must contains a 0x89 ‘pitlane cmd; right pits’. 5- sector p13. It must contains a 0x97 ‘pitlane speed limiter off’. 6- sector p15. It must contains a 0xa0 ‘pitlane fences end’. 7- sector p17. It must contains a 0x9e ‘pitlane end length’. The argument of this command must be two units shorter than the length of the sector. Also in the track we must care about two other commands:
at sector t5 there must be a 0x87 ‘connect pitlane end’
at sector t75 there must be a 0x86 ‘connect pitlane start’ Most of the times, some Gp2 commands are converted into their Gp3 equivalent, but from a game to another they can change their meaning, so we can find lots of ‘track width change’ and lots of ‘set fence extention on/off’. This one is the kind of command that can cause a crash. So using the option TRACK -> REMOVE ALL 0xXX commands we need to remove this kind of commands. At the same way we can remove all those ‘track width change’ from the menu REMOVE. To finish our work we can change the name of the track and the number of laps using the option TRACK -> Gp3Info. Now we are ready to load the track and see if it works (in debug mode if needed). If it loaded we surely noticed that in the car parking instead of the tarmac we found the grass. A fast way to add tarmac is to use the 0xe9 ‘texture mapping’ command to map the tarmac (id 1229) for the length we want. If we have no experience in command editing there is an alternative and still faster way. This way will allow to add the same custom tarmac of the road cousre so we’ll be able to see eventually also the jips placed there. If the track we converted has the pitlane on the right we will consider in example the Gp3 track F1ct03 (Buenos Aires) as our model, while if the pitlane is on the left side we’ll consider F1ct08 (Magny Cours) as our model. The track in the example has the pitlane on the right. So we need to open also Buenos Aires in the same editor and set the windows with ‘tile vertical’ for convenience:
Now in the pit data of the Buenos Aires track we need to look for the sector p14 as shown in the next pic
Now, one by one and without opening them, we need to copy the first four commands (all 0xe9) and paste them in the sector p9 of the pitlane of the Zuhai track (see the pic of the pitlane posted above to locate the sector). If the pitlane of the converted track is on the left side we need to do the same operations but this time the track to open is Magny Cours. In this case we need to look for the sector of the pitlane p6 and copy one by one the three 0xe9 commads still without opening them into the converted track. In this way when we load the track we’ll see the tarmac under our wheels. It’s important to know that those 0xe9 commands can be placed 1 sector before the car parking area so all cars will stay on tarmac and eventually re-pasted some sectors later if some cars at the end are still parked on the grass. If we want to give some ‘life’ to our converted track without any advanced editing we can use the coincidence that the converted track took now the structure of the original Gp3 we used as base and then it uses the same jams and shared the same objects. This means that we can import objects in the converted track just using the functions CTRL-C CTRL-V. At the same way of the textures, we need to open in the same editor both the converted track and its own Gp3 base track (in this case Montreal).
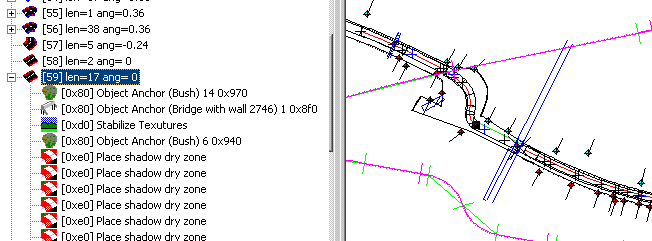
Now the only thing we have to do is to copy the objects we want from the sectors where they are placed and paste them into our converted track in the places we want. In example we can import into Zuhai the famous bridge before the chicane of Montreal:
Another thing we may have noticed is that driving the track, the cc-line may appear not in the right place, sometimes driving too close the centre, sometimes even out of the track. This happens because the converted track took the track width that was of its base track. In the example above Zuhai will have the track width of Montral with its obvious unconveniences. For this reason it is important to re-establish again the correct width. In few words we have to duplicate all the track width commands of the gp2 track in the Gp3 version placing them in the same sectors and having the same arguments. For this procedure we need also the Gp2 Track Editor. In the Gp2TE we’ll open the Gp2 Zuhai and in Gp3TE we’ll open the Gp3 Zuhai. Now scrolling one by one all the Gp2 track sectors, we’ll locate all the commands that alter the width and in the Gp3 version we’ll insert the proper command to reproduce the same alteration. As we are involved in this procedure we can take the chance to also reproduce in Gp3 other commands as we meet them in the Gp2 track like the cc-cars coaching commands.